How To Conduct TP Link Wifi Extender Setup Using WPS Button?
Are you facing various connectivity problems like that of slow wifi speeds or your wifi connectivity drops suddenly? No matter what exactly the concern is, TP Link wifi extender setup can help you eradicate all such problems. The range extender works with your router. What it does is, it gathers signals from your router. Thereafter, it strengthens these signals as well as multiples them in number and then it sends them to different locations of your abode. Thus the problem of slow speed and other connectivity problems no longer persist. But to fetch this benefit, you must know about the accurate installation steps. Now the easiest method through which you can install the TP Link wifi range extender is using the WPS button. So in this particular blog post we’ll list the complete guidance for this method.
What Are The Requirements For The Setup ?
For TP Link wifi extender setup you require very few basic components. These are:
- A well working router with WPS functionality.
- Next up, you need a vacant electrical switch board for supplying an adequate amount of electricity to the TP Link extender.
- Lastly, all the components that came in the package box that are the extender itself and its power adapter.
Setup Steps
For easy understanding, the process has been broken into multiple steps. So with no further deferment, lets begin:
- Start by plotting the TP Link device nearby to the router.
- Now using the given power wire, turn on the extender.
- Wait for the device’s status indicator to turn stable.
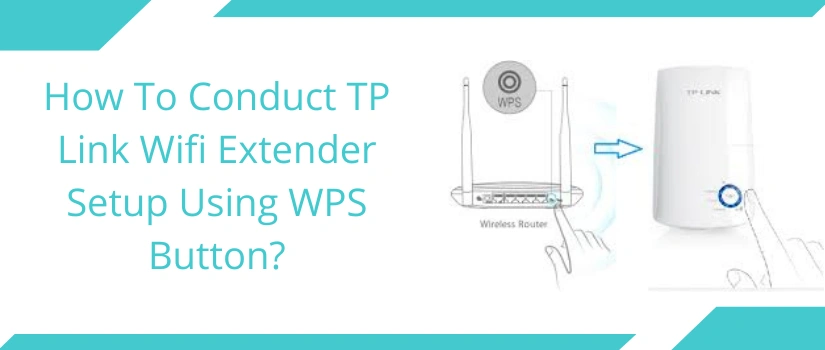
- Next up, press the WPS button of your router. As you press it, the wifi protected setup indicator will start flickering. If it doesn’t flicker, then again push the button.
- Thereafter, move towards the TP Link extender and press its WPS button. Its indicator should also start flickering.
Note: After you activate WPS function on the router do not give a gap of more than 120 seconds to press WPS button on the extender.
- Finally as you activate the WPS function of both the devices the syncing process will last for two minutes. So meanwhile users just have to wait.
- Lastly, as the WPS indicators turn steady, you can come to a conclusion that the TP Link wifi extender setup process is done successfully.
Post Setup
As the setup completes, you now have to unplug the TP Link extender and move it to a place where it can serve the right purpose. So place it in the middle of your router and the problematic area. Make sure your chosen spot receives not below fifty percent signals from the router. Now as you reactivate the TP Link wifi extender setup it will automatically sync to the router. Thereafter as you pair your device to the extended network, you must receive high speed wifi connectivity in each and every area. If the connectivity isn’t proper, then make sure the TP Link device is in an open space, not behind curtains or other objects.
Moreover, keep the electrical and metal items far from the extender. For best coverage, choose a highly elevated spot for the TP Link extender. You can keep it on the table top, on some wooden plank or on shelves as well.
For other queries, you can call the experts directly or initiate a live chat.