Linksys RE1000 Extender Setup: Detailed Guide with Troubleshoot
Nowadays, Wi-Fi has become very essential. A strong internet connection is needed for everything from working remotely and streaming movies to controlling smart home devices. However, even with a good router, you may face certain issues with the connections. This is very often because of barriers like walls, doors, electronic objects etc. This is where the Linksys RE1000 Extender works as a game changer. To use the device, you need to configure it. Linksys RE1000 Extender Setup process is very simple when you are aware. Here is the detailed guide about the configuration you need. You may also try out the troubleshooting steps in case any obstacle in the network arises.
Linksys RE1000 Range Extender Setup Process
Before diving into the Linksys RE1000 Extender Setup process, you should know every method. First & foremost method is CD based. Other methods are web based and WPS based. You can opt for any of them. We are going to detail the steps of every method.
CD Based Linksys RE1000 Extender Setup
To proceed with the CD based setup process you need a computer/ laptop, power plug & extender device. Make sure you have everything before commencing the setup to avoid trouble.
- First of all, insert the CD in your computer/ laptop. Use the device that is connected to the same router for which you wish to extend signals.
- Next step is to read the terms & conditions that appear on the screen.
- After that click on “next” option and plug the extender in the power outlet.
- In the next step, you need to select the network from the list that appears on screen. Thereafter, enter the password & click on the “ok” option.
- Now choose the “next” option and the setup process is complete.
- At last you can move your extender to another place closer to the weak network zone but within the range of the router.
Web Based Setup: Wired
For a web based wired setup process, you need Ethernet cable, computer/ laptop, power plug & extender device. Follow the steps to do the configuration as given below after plugging in the extender in power outlet:
- Firstly, connect the extender with the computer/ laptop by using an Ethernet cable.
- Thereafter you need to open a web browser you wish to use.
- You need to go to the address bar and mention “http://extender.linksys.com/ or http://192.168.1.1”
- Now press on the “enter” & default page of setup displays.
- Move ahead & enter the default password. Leave the username field blank and press the “ok” option.
Web Based Setup: Wireless
For web based wireless setup, you need a computer/ laptop/ mobile/ tablet, power outlet & extender device. By following the steps given below you can easily configure your device:
- Prior to moving ahead, plug the extender device in the power outlet.
- Second step is to open your client device & go to the WiFi section.
- Search for the extender pre-configured SSID showing as “LinksysExtenderxxxxx” (xxxxx means last five digits of extender series).
- Click on the “Associate” option and thereafter, you have to open a browser.
- You need to go to the address bar and mention “http://extender.linksys.com/ or http://192.168.1.1”
- Now press on the “enter” & default page of setup displays.
- Move ahead & enter the default password. Leave the username field blank and press the “ok” option.
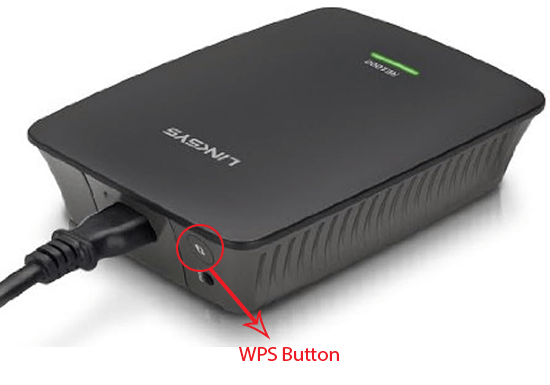
WPS Based Linksys RE1000 Extender Setup
To proceed with the WPS based setup of your device, you need a router with WPS button & a power outlet for extender connection. By follow few steps given below you can move ahead:
- First press the WPS button on the extender & then on the router.
- Hold the router WPS for a while & wait for the LED to lighten up continuously.
- If your setup process fails, light flashes quickly for two minutes.
- Try again the process if any error occurs.
Linksys RE1000 Extender Troubleshooting
While proceeding with configuration steps, you may face some troubles. Many of the users have experienced them. Here we are going to describe how you can get out of the issue, if you also experience while Linksys RE1000 Extender Setup:
First: Issue in Connection with Extender
In case you are not able to get connected with the extender you need to do the following
- Check the position of your router & extender. If there is a lot of gap between the two, you need to reduce it. Place the extender closer for the first time.
- In case you are trying to connect by using wireless mode, wait until the WPS indicator on the extender stops blinking before moving ahead.
- Check that the firmware of the router is up to date or not. Sometimes older firmware of the router creates issues in establishing connection.
Second: Not Able to Access Your Extender
In case you are not able to access the extender you need to check the following:
- Confirm that you are connected with your router network.
- Check whether you are using accurate login details.