Linksys RE6300 Extender- Specifications & Setup
You can easily set up your range extender with the guidance we are providing through this page. Linksys RE6300 Extender step process is very straightforward. By setting up your Linksys RE6300 your Wi-Fi coverage will get extended. Steps to configure your extender are preparing your device, connecting it to your network, and finalizing the setup. You will get a stronger signal in areas with weak connectivity once setup is complete. Detailed information on Linksys RE6300 Extender step with key specifications explained underneath.
Linksys RE6300: Key Specifications
Linksys RE6300 Wi-Fi range extender is designed to improve network coverage and performance. Here are the key specifications of the Linksys RE6300:
- Model Number- RE6300
- Wi-Fi Technology- AC750 (Dual-Band)
- Wi-Fi Standards- 802.11a/ 802.11b/ 802.11g/ 802.11n/ 802.11ac/ 802.11ab
- Antenna- 2 internal antennas
- Coverage- Up to 6,500 square feet
- Maximum Data Rate- 2.4 GHz- Up to 300 Mbps & 5 GHz- Up to 433 Mbps
- Ethernet Port- 1 x 10/100 Mbps Ethernet port
- Security Protocols- WPA/WPA2 mixed mode, WPA2-Enterprise, WPA2-Personal, 64/128-bit WEP
- Encryption- 64-bit, 128-bit, WPA2-Personal, WPA2-Enterprise
- Dimensions- 126.1 x 81.8 x 46.8 mm (4.96 x 3.22 x 1.84 in)
- Weight- 120 g (0.26 lbs)
- Power Supply- 100-240V AC, 50-60 Hz
- LED Indicators- Power, WPS, Ethernet & Wi-Fi signal strength indicator
Preparation and Requirements
Before diving into the Linksys RE6300 Extender setup process, you need to ensure you have the following:
- Linksys RE6300 Range Extender
- Wi-Fi Router
- Power Outlet
- Computer, Tablet, or Smartphone
- Network Name and Password
Linksys RE6300 Extender Setup Process
Setup process may include a few easy steps. You may follow these steps to easily configure your extender and eliminate dead zones. Without any further discussion, let’s start the setup:
Positioning the Extender
It is significant to position your extender correctly for the optimal performance. Plugging in the Extender is the first and foremost thing you need to do. Plug your RE6300 into an electrical outlet. You need to position your extender device midway between your router and the area where you need better coverage. Make sure the extender device is positioned nearby your Wifi modem/ router. Check the Indicator Light on your extender device once you plug it in. The extender’s power light should turn solid. In case, your device is showing blinks or doesn’t show any light, try to change the power outlet. If light is blinking in the beginning, wait for a few seconds, till it stops blinking. When light becomes solid green or amber, indicating it’s ready for setup.
Connecting to the Extender
Now, you need to connect your client device to the extender to begin the setup process. To connect you need to go to the WiFi settings on your device (computer or mobile) & search for the default network name of the extender. Select it & connect your device. Open a Web Browser and go to the address bar & type in `http-//extender.linksys.com. This will direct you to the Linksys RE6300 extender setup page.
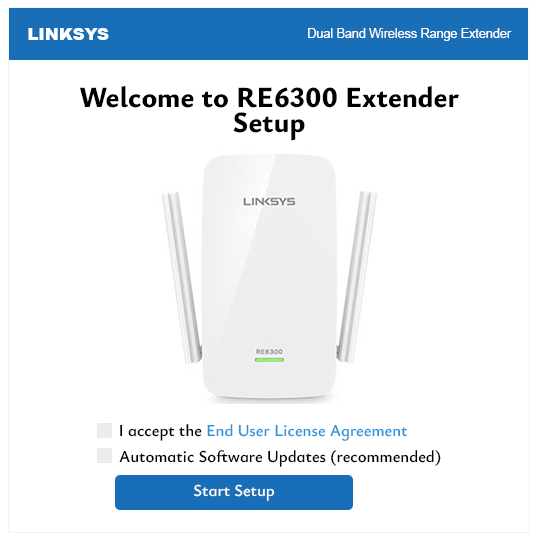
Accessing the Setup Page
- Start the Setup- Click on the “Start Setup” button to begin. Agree to Terms and Conditions before proceeding as shown on the screen. Make sure to read through them before clicking the “I Agree” option to continue the process.
- Select Your Wi-Fi Network- On the setup page, a list of available networks will display. Choose your existing Wi-Fi network from the list. Conditionally, you have a dual-band router, you’ll see both the 2.4 GHz and 5 GHz networks. You can choose any one of them to extend the network.
- Enter Your Wi-Fi Password- Now you need to provide the password of your WiFi. Make sure you enter it correctly to avoid any connection issues.
- Assign an Extender SSID- Here you’ll be asked to assign an SSID for the extended network. You can choose the same ID as your main network or a different one, as per your choice.
- Finalize the Connection- After completing the password and SSID setup, your extender will attempt to connect with your router. This process might take a few minutes. You’ll see a confirmation screen once the process completes.
Positioning and Testing
Once the Linksys RE6300 Extender setup completes, you need to position it optimally and test its performance-
- Relocate the Extender (If Necessary)- You can move your extender device now if required and place it to the area with weak signals. Must remember, the extender should remain in the range of the main router.
- Check the Signal Strength- Signal strength is shown on the extender via LED. Green light indicates strong signal, amber indicates a weaker connection, and red indicates no connection. If its LED turns amber or red, change the position and place it closer to the router.
- Test the Extended Network- Must test your extender network by connecting it to a wifi enabled device. You can use your smartphone to connect to the new extended network. Move around the area to check if the coverage has improved or not. To ensure stable connection you need to test the speed by loading web pages or streaming videos.