Linksys Velop MX10600 Setup

Live Chat

Struggling with a technical issue? Write to us right away. Our support team often responds quickly.

OR

Don’t want to wait? Call us right away.

    Linksys Velop MX10600 Setup a Complete Guide

    Linksys is a well-known name in the tech industry offering a diverse range of devices. These devices are essential for creating a reliable network and optimize your internet surfing experience. Linksys Velop MX10600 is a mesh wifi 6 system. The device supports tri-band network coverage. This device is offering more speed, coverage, and capacity than any other WiFi technology. Linksys Velop MX10600 Setup is appearing to be an overwhelming process. However, in reality it is an effortless process. To begin with the process, you just need complete knowledge and accurate guidance. Further in this article we are going to detail the steps you need to follow for Linksys Velop MX10600 Setup.
    Linksys Velop MX10600

    Velop MX10600- An overview

    Before using any device, it is important to understand it. This will help in further preceding and get best out of the device. Firstly, let’s understand the Velop MX10600 device, its specification & features. Thereafter we jump into the Linksys velop MX10600 setup process.
    • This device is equipped with 2.2 GHz Quad-Core Processor & internal antennas.
    • The device is performing 4X better than an AC router.
    • It has one USB 3.0 port with four Gigabit Ethernet Ports.
    • Next-Gen OFDMA Technology is used in velop MX10600.
    • App based Linksys Velop MX10600 Setup is very easy.
    • The flash memory of the device is 512 MB with 1GB RAM.
    • Its advanced security features support WPA2 and WPA2 / WPA3 Mixed Mode.

    Overall, this device is an optimum option for your home mesh WiFi network. Without any further ado, let’s move towards Linksys velop MX10600 setup steps.

    Linksys Velop MX10600 Setup Prerequisite

    Prior to moving towards the setup there are certain prerequisites. You need to fulfill all these to ensure even setup without any hindrance. Here is the list of things you need to do before setup.

    Unboxing the Linksys Velop MX10600

    Firstly you need to unbox your device box. In this box you will get nodes, power adapter, Ethernet cable and printed documentation along with a guide manual.

    Position the nodes

    You need to position the primary node closer to the modem and additional nodes to the place where you are experiencing weak signals.

    Modem with Working Internet

    You also need a Modem that has a working internet. Must ensure your internet is working before beginning the process.

    Download the Linksys app

    After unboxing you need a client device in which you can download the Linksys app. The app is available to install on google play store for android users whereas on app store for IOS system. Get the app installed on your device from there.

    Create a Linksys account

    once the installation is complete you need to create a Linksys account. You need to go to the app and provide the information required. Application will direct you to create an account.

    Linksys Velop MX10600 - Tri-Band Mesh WiFi 6 System Setup

    Once all the above things are ready, you can move further with the Linksys Velop MX10600 setup steps as described:
    • First of all, power up your Linksys node device by inserting the adapter in the device and power outlet.
    • The LED on the device will start blinking blue, wait till it turns into purple light.
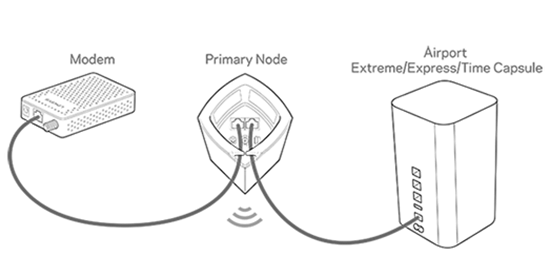
    • Connect the modem with the primary node by an Ethernet cable. To establish the connection between the two, you need to insert the Ethernet cable in Ethernet ports of both devices.
    • Open the app you have downloaded prior & select “set up a new network” option from there.
    • AFollow the instruction on the app screen and create your network ID
    • Remember to create a password with required length yet memorable and strong.
    • Wait for the completion of the configuration steps. If the LED light on the node is blinking purple it means the process is ongoing.
    • Once the process is complete you will see solid blue light on the LED.

    Additional Nodes configuration

    In the mesh network you can connect additional nodes. Connection of other nodes can be established without Ethernet port connection. For configuring additional nodes, plug them in the power socket and wait. Node will show blinking blue light in the beginning that turns into solid purple later. Let the node establish connection. The process begins when light starts blinking purple. Follow the on screen guide in the app. You will see the node light turn solid blue afterwards when the process is complete.

    After adding all the additional nodes to the network, you need to click on the finalize setup option. This will end the process.

    Ultimate words

    At last you need to run a speed test of the network. If you find weak signals somewhere, try to reposition your node device. In case, the LED on the node device turns red it means your nod is not receiving internet from modem. Relocate the device closer to the modem. Moreover, if it shows solid yellow light, it represents weak signals.