Easy And Straightforward Linksys Velop MX4200 Setup Guide
Are you tired of slow and intermittent internet connection or constantly facing the issue of dropped signals in different corners of your home? If yes then it’s time to get yourself a powerful and trustworthy Linksys Velop MX4200 Setup. There is no denying the fact that the internet is required to complete our day-to-day tasks successfully and with convenience. You do not require just the basic internet, rather we need ultra-fast and smooth access to the internet and one device that will provide you with the same is Linksys Velop MX4200 Setup. Whether you need to write assignments online, collect data, do online shopping, pay bills, stream HD videos, play high-intensity games or simply want to do internet surfing, all these activities can be done with ease when you have Linksys Velop MX4200 installed in your place. So if you decide to invest in this super-powerful device then here are different methods through which you can easily set it up.
Method 1: App-Based Setup
The app-based setup is super quick, and easy and can be done in just a few clicks. So here’s how you can do it. For your convenience, we have divided the steps into three parts.
Part 1: Preparation
- Download The Linksys App: If you are an Android user then open your Google Play Store and search for “Linksys”. Once found, download and install it. For iOS users you can download and install it from the App Store.
- Create An Account: In case you are already a Linksys app user then just log in to your account by using the login credentials. If you are a new member then create an account. For creating the same Choose “Create an Account” and follow the prompts to enter your email address, password, and other necessary details.
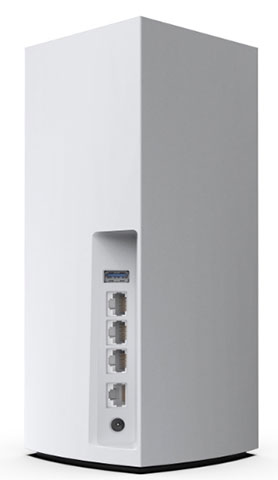
- Prepare Your Equipment: Unbox your Linksys Velop MX4200 Setup and collect the primary nodes, adapters and all the equipment that came along. Now, place the primary node in a central location which should be close to your modem and make sure the modem has a proper supply of electricity and is also functioning well. Once done, we will start with the further process.
Part 2: Setup
- Connect your primary node with the modem. Do this, with the help of an Ethernet Cable.
- Now, connect the primary node to an electrical outlet for a proper and uncut supply of electricity. Wait for a few seconds for the LED light on the node to get stable.
- Once it’s stabilized, launch the “Linksys App”. In the app, tap “Set Up a New Wi-Fi Network” or a similar option. And from here on just keep on following the on-screen instructions and it will help you with the whole process easily.
- It’s time to test your network. You can do so by moving around your home and in case you notice any dead zone then consider adding an additional node for that specific area or re-adjust the nodes more strategically.
Part 3: Post-Setup
- Once you set up the device primarily, you can now customize various settings and can also check and monitor the overall performance of the device, see the number of connected devices, change the default settings and passwords, create a separate guest network and much more.
Method 2: Web Browser Based Setup
If you do not want to follow the above Linksys Velop MX4200 Setup Method then you can continue with the Web Browser based method. This method is also super easy and can be done by anybody. So without further ado let’s begin.
- Begin by establishing a connection between your modem and your primary velop node. To connect use an Ethernet cable. Now plug the other end of the Primary Velop Node into an electrical board and power it on. Wait for the LED light on the node to stabilize. It can take up some time to get completely stabilized so do not panic in the meantime.
- Now, connect your chosen device to the Velop’s default Wi-Fi network or you can also establish a physical connection directly with the help of an Ethernet cable. You can easily find the network name and password on a sticker that is pasted on the primary node.
- It’s time to open a web browser. Once opened, go to its address bar and enter the default IP address for the Velop node which is “http://myrouter.local” or “http://192.168.1.1” and press “Enter”.
- As soon as you press enter, you will be asked to log in and for this use the default details which is “Admin” for both the Username and Password.
- Once you enter the correct details, the screen will itself guide you further. So just keep following the on-screen instructions and your setup will be all done with just a few more clicks.
- To add additional nodes, repeat the above steps for every single addition.
- Once done you can configure various settings and change them as per your preferences. Once done do not forget to “Save and Apply” on those changes. And that’s it, your Linksys Velop MX4200 setup is all done. Wasn’t it super easy?