Rockspace AC750 Extender Setup

Live Chat

Struggling with a technical issue? Write to us right away. Our support team often responds quickly.

OR

Don’t want to wait? Call us right away.

    AC750 Rockspace WiFi range extender device helps to increase the range of WiFi signals. The AC750 Rockspace extender configuration process is not so much difficult. To learn more about this AC750 Rockspace extender device, study the information below.
    Rockspace AC750 Extender

    Access Rockspace AC750 Web Page

    First, in an electrical socket place the AC750 Rockspace extender power plug. Now, take the computer and connect that to the AC750 extender default network. After that, open the chrome and hit re.rockspace.local in the address bar. Fill in the Rockspace extender default login credentials and tap on the login button to access the Rockspace AC750 extender web management page. In case, you don’t know the login details then check the tag or bottom.

    Can’t Access Extender Login Page

    • Must enter the correct login details.
    • The computer must be connected with an extender.
    • Place the extender in a power-supplied electrical socket.

    Configure AC750 Extender By WPS

    Note:- At the start of this method process, verify that your existing router must support the WPS button.

    To configure the Rockspace AC750 extender by this WPS method then place the extender extender into an electrical socket closer to the router. After that, press the power button of the extender to turn it on. Further, press both the router and extender WPS button. By doing this, the extender automatically connects with the host router. In the end, when you are facing slow internet speed, place the extender there after taking it out from the socket.

    Rockspace AC750 Extender Setup Through AP Mode

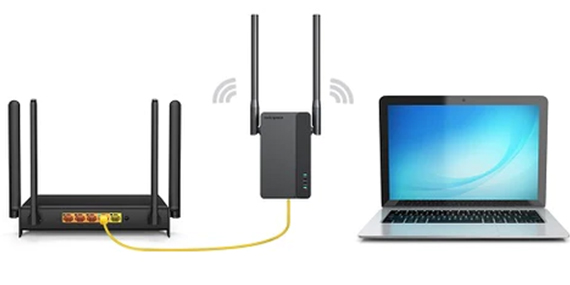
    First of all, go to the Rockspace AC750 extender web management page. After that, click on the operating mode option and then on the AP mode option. Further, link an extender with the router LAN port by an ethernet cable. Later, in the specified power socket place the Rockspace AC750 extender power plug. In the end, take a WiFi device and connect with an extender network to enjoy the internet.

    After doing the Rockspace AC750 setup by the apart two methods if you are facing any kind of error such as the extender not working perfectly or not providing high internet speed. Then try the lower tips to fix an extender error.

    Points To Fix Extender Error

    There are several points, by trying those points instructions you can quickly fix an extender error.

    Install Latest Software Version Of Rockspace Extender:-

    To download the latest software version, go to the login page. For this, connect the computer to Rockspace AC750 default network. Now, type the default IP address 192.168.1.250 in the Chrome search engine bar. After that, fill in the details and look for the network administrative option. Further, click on the software installation option. Later, if you find any latest version software file then install it on your laptop or computer. The installation process will be complete in 15 minutes.

    Powercycle Rockspace AC750 Extender:-

    To power cycle the AC750 extender, press the power button to turn it off. After that, from an electrical socket take out the extender power plug. Further, wait for a while and place the Rockspace AC750 extender power plug back into an electrical socket. At last, press the power button of the extender again to power it on.

    Change Placement:-

    We recommend you change placement and place the extender at the optimal location. Butt make sure when you change the placement of an extender, identify that near to that no metal or electronic appliance is placed.

    Identify Every Hardware Part:-

    I recommend you look at all the hardware parts that link with the Rockspace AC750 extender. Such types of hardware parts are ethernet cables, power sockets, etc. If any hardware part is damaged or corrupted then immediately replace it with a new one.

    Execute Hard Reset:-

    To execute the hard reset, look for the reset button on your AC750 extender. After that, take a paper clip or pin and insert it into the reset button. By inserting the pin, all the Rockspace AC750 extender LEDs will turned off. All power-off LEDs indicate that the extender is completely reset now.

    Note:- After doing the hard reset you will required to do the Rockspace AC750 setup and login process again.

    After the entire information on this page, you can enjoy high-speed internet from the AC750 extender without any trouble. In case, if you face trouble then you can also easily fix it with the apart solution tips. Talk to our technician if you have a query in your mind. Have a great day.