Troubleshooting Common Issues During Wavlink N300 Setup
Wavlink Extender Not Working Issue
- When the connection between the extender and the router is weak or there is no connection.
- Signal interference due to electronic devices and other objects.
- When the extender is running on the older version of firmware.
- Problem with the router
- ISP issues
Wavlink Extender Not Connecting to the Internet Issue
- The internet connection is not working properly.
- The extender and the router are not within the range.
- When the extender is not receiving the wifi signals from the main router.
- Problem with the power plug.
- The Wavlink extender orange LED is not working properly
Troubleshooting Tips
Power Cycle the Extender
Before moving into advanced troubleshooting, a simple reboot can solve many problems. So, try power cycling your extender. This action clears the device’s temporary memory and can resolve minor issues.
How to Power Cycle the Extender?
Unplug the extender from the power outlet and disconnect all the cables. Wait for 30 seconds and plug it back. This will restart your extender. Now connect your extender to the internet.
Check the Connection Between the Router and the Extender
We have discussed above that this problem occurs when the extender is not properly connected to the router. So, check the connection. The extender is connected to the router in two ways one is with an ethernet cable and the other via wifi.
If the extender is connected wirelessly, verify that the power outlet in which the extender is plugged in is within the range you want to extend and closer to the main router. Also, check there should not be any obstruction between the router and the extender. The green lights on the extender indicate that the extender and router are properly connected. If there are no green lights cross-check the connection.
Furthermore, the placement of the extender is also important. Try to place it in the central location, away from obstructions, and keep it on the shelf or table. Avoid placing it on the floor.
Keep the Devices Within the Extender’s Range
The Wavlink extender is in the list with the name “Wavlink_ext” and you have to make sure that you are connected to the correct network. Also, check that your devices are within the range of the extender. The wifi range is basically the distance between the devices and the various access points. This range varies based on device type and the network environment.
If you perform bandwidth-intensive activities more, you can face the dropout problem. Therefore, you can think of one more extender to get better connectivity.
Before discussing the other troubleshooting problems, let’s first perform the Wavlink N300 Setup
Setting up Wavlink N300
- Gather all the necessary things first, like the extender unit, power adapter, ethernet cable, and user manual.
- Now connect all the devices, the extender to the power outlet, the router to the modem, and the smartphone or computer to the internet.
- On your smartphone or computer, open the browser and enter the IP address of the extender in the search bar.
- Now enter the login credentials to log into the admin panel. Here, follow the instructions given on the screen, do the desired settings, and click on the “Save” or “Apply” button to save the changes.
- The setup is done. Wait for a few seconds, the extender takes some time to reboot.
Troubleshooting Tips After Wavlink N300 Setup
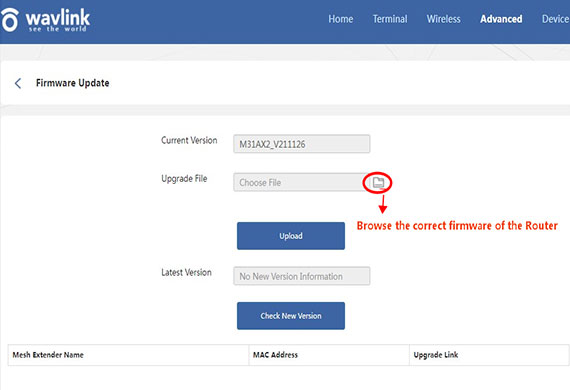
Update Extender Firmware
Choose the Different Wireless Channel
Contact Support
We hope the information provided on this page is useful and helps you resolve many issues. Setup issues? Need assistance in Firmware update? Or Any technical concern? Just ask your problem and get the instant solutions. Contact us via call, live chat, or email. Moreover, you can connect with our tech professionals anytime, we are available 24/7.