WL NWP502W2 AV500 Powerline Setup Step By Step Instructions
Get a stable and reliable high speed internet connection with WL NWP502W2 AV500 Powerline setup. It is an adapter device that can be installed on a wall electric plug and use your home electrical wiring circuit to transmit data. With the setup of powerline adapters you can enjoy high speed data transmission up to 500Mbps and enjoy lag-free HD streaming and online gaming. To use high speed internet using powerline adapters you don’t need to perform any configuration. You can install and set up the device very easily. Checkout the setup process on the further segment of this page. Read the step by step instructions and complete the setup. You can move ahead with the setup even if you are not tech savvy with our guidance.

WL AV500 Powerline Adapter Overview
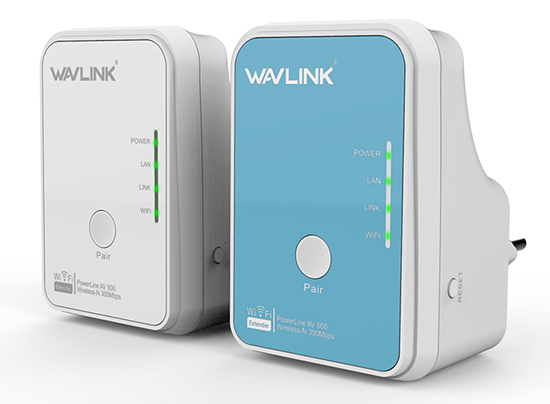
You should know your device in-depth before using it. You can get the best out of your device if you are aware of its features, LED behavior, and design. It is clear with the name of the device itself, it is a compact wall device that can easily be installed anywhere. With the WL NWP502W2 AV500 Powerline setup you will get greater flexibility and stability than traditional range extenders. The device has an ethernet port to transmit data. On the front panel of the device you’ll find a pair button along with four LED indicators. These indicators indicate power, LAN, Link and WiFi. Also the device has a reset button to restore its settings back to the factory.
WL NWP502W2 AV500 Powerline Setup Process
To begin the WL NWP502W2 AV500 Powerline setup you need a working home router network, powerline adapter devices, two RJ45 Ethernet Cables and wall electric outlet. You can complete the setup by follow the further given step by step guide:
Installation
Unboxing Of Adapter
Unboxing is the first step of the powerline device setup. In the box along with the wavlink powerline adapters set you will find a user guide and a pair of ethernet cables. Take the adapter out and look for the place to connect it with the power.
Connect To The Power
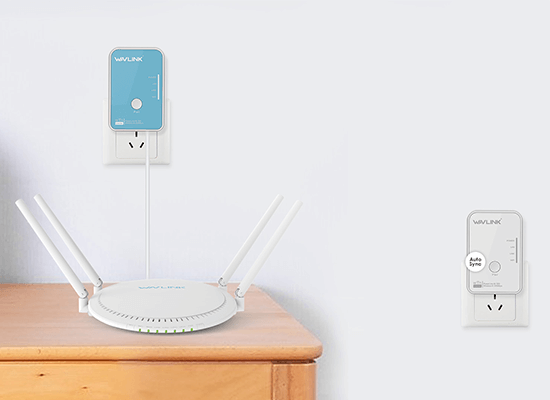
Once you find the appropriate location to connect the device with the power outlet, take one of them and connect it next to your router device. It is highly recommended to connect to the wall plug that has a single socket. Once the device is connected with the power you will see the power LED of the device lit up.

Connect To Home Router
Now you need to connect the powerline adapter device with the router’s device. You can use ethernet cable to establish the connection. Connect an end of the cable in the router’s ethernet (LAN/WAN) port. Also connect the other end of the cable in the LAN port of the powerline adapter. Once the device is connected to the router, you’ll notice the LAN LED of the device Lit up.
Connect Other Powerline Adapter
Now you have to connect the other powerline adapter to the location where you desire to extend the internet. Location of the placement of the other device should be on the same electric circuit. This will enhance the network and prevent any disturbance in the root of data.
Pair The Devices
The main step of the WL NWP502W2 AV500 Powerline setup is pairing the device. The device will automatically connect to each other when you plug-in the other device on the same circuit. Link LEDs turn on to signify the successful connection. To enhance the security of the network you need to use the pair button. Firstly press the pair button on any of the one powerline adapter device. Hold it for 2 seconds and thereafter press the pair button on another adapter. This process of pair button pressing on both the devices must complete within 2 minutes.
Verify Connection
Once done, check the LEDs of both the devices. In case the Link LED & WiFi LED is turned on it signifies that the connection is completed successfully. In case you notice red light on the powerline adapter LED then you need to change the location of the device. Try another power outlet and then check the LED color turn or not.
Web Configuration (Optional)
Web based configuration steps are not mandatory to follow. This process will help you in replacing the domain name of your device. To move ahead with the process firstly, you need to use the IP address. You can get the IP address on the top of the device if not then you can use static IP to continue. Launch a browser and enter the IP in the address bar. Get the access to your device and make changes in the domain name. Follow the screen and make changes.
You can connect our technical experts to grab more detailed information. Also if you face any issue with your wavlink powerline adapter. Our team will guide you with the WL NWP502W2 AV500 Powerline setup and troubleshoot the issue as well.